doc/code/getting_started.rb in motion-prime-0.5.6 vs doc/code/getting_started.rb in motion-prime-0.5.7
- old
+ new
@@ -1,54 +1,92 @@
+# ** Why MotionPrime? **
+
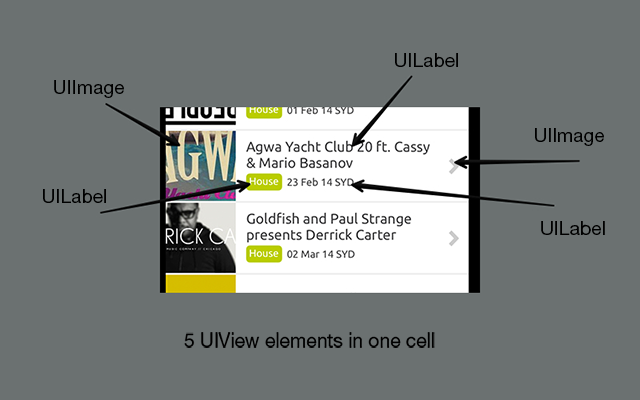
+# Did you ever notice that table views in your RubyMotion application scrolls not smoothly?
+#
+# Let's see why:
+#
+# 
+#
+# Each table cell will create 5 UIViews inside and it's very slow operation for mobile device.
+# The main feature of MotionPrime is that it creates abstraction layer for "elements" in screen.
+# If it's possible in current context, MotionPrime will draw elements directly in table cell using CoreGraphics.
+# Just add 'label' element to the section:
+
+class MySection < Prime::Section
+ element :greeting, text: 'Hello World', type: :label
+end
+
+# It will be rendered 5 times faster in iPhone 4/4s for cells containing 5 elements.
+#
+# You can force it to use UIView instead of CoreGraphics:
+
+class MySection < Prime::Section
+ element :greeting, text: 'Hello World', type: :label, as: :view
+end
+
+# MotionPrime contains other features to improve application performance, but performance is not the only feature.
+#
+# So let's get started.
+
# **1. Install required tools.**
----
# * Ruby 1.9.3 or newer.
$ rvm install 2.0.0
# * RubyMotion.
Visit http://www.rubymotion.com
-# **2. Create application delegate.**
+# **2. Create MotionPrime project.**
+
+$ gem install motion-prime
+$ prime new hello
+
+# **3. Create application delegate.**
#
-# You should rewrite the `on_load` method, which will be runned after starting application.
+# E.g. `hello/app/app_delegate.rb`
#
-# NOTE: you should always use AppDelegate class name.
+# Inherit `AppDelegate` class from `Prime::BaseAppDelegate` and rewrite the `on_load` method, which will be runned after starting application.
class AppDelegate < Prime::BaseAppDelegate
def on_load(app, options)
open_screen :main
end
end
-# **3. Create the main screen.**
+# **4. Create the main screen.**
#
-# You should rewrite the `render` method, which will be runned after first opening screen.
+# E.g. `hello/app/screens/home.rb`
#
-# NOTE: it's recommended to use instance variables for sections, e.g. `@main_section` instead of `main_section`.
+# Inherit screen from `Prime::Screen` and rewrite the `render` method, which will be runned after first opening screen.
+#
class MainScreen < Prime::Screen
title 'Main screen'
def render
@main_section = MyProfileSection.new(screen: self, model: User.first)
@main_section.render
end
end
-# **4. Create your first section.**
+# **5. Create your first section.**
#
+# E.g. `hello/app/sections/home/section.rb`
+#
# "Section" is something like helper, which contains "Elements".
#
# Each element will be added to the parent screen when you run `section.render`
-class MyProfileSection < Prime::Section
+class HomeSection < Prime::Section
element :title, text: "Hello World"
element :avatar, image: "images/avatar.png", type: :image
end
-# **5. Create your first stylesheet file.**
+# **6. Create your first stylesheet file.**
#
+# E.g. `hello/app/styles/home.rb`
+#
# Styles will be applied to each element in section.
# The simplest rule by default is: `:section-name_:element-name`.
#
# E.g. if you have "MyProfileSection" (the name for section by default will be - `my_profile`)
# and "title" element, then you should use `my_profile_title` style name.
@@ -59,6 +97,10 @@
# You can pass namespace to `define` method.
Prime::Styles.define :my_profile do
style :title, width: 300, height: 20
-end
+end
+
+# ** Next **
+#
+# [Read more about Screens](screens.html)
\ No newline at end of file