Camera trick lets you see sound waves in falling water

24hz-water-camera-trick

From this still image you’d think the hose dispensing the water is being moved back and forth. But watch the video after the break and you’ll see the hose is quite steady, as is the standing wave of water. It’s bizarre to be sure. Knowing how it works makes cognitive sense, but doesn’t really diminish the novelty of the demonstration.

This is the second time [Brasspup] has posted a video of this phenomenon. The newest version does a great job of showing several different patterns. But even the first segment from a year ago, which has over 4 million hits, shows the water moving against gravity. We also saw a similar rig in a links post a year ago.

We’d call it an optical illusion but it’s really more of a technological illusion. The water is falling past a sub-woofer speaker which is tuned to 24 Hz. At the same time, the camera filming the demonstration is capturing 24 frames per second. As was mentioned then, it’s much like flashing a light to freeze the water in mid-air. But the flashing of the frames is what causes this effect.

[Read more...]

Raspberry Pi as a Spotify server with MPD control

rpi-spotify-mpd-client

The Raspberry Pi has been very popular as a streaming music player. Sure, the only audio out option on the board is an analog stereo jack, but you can use a USB audio device to improve upon that if you wish. [Wouter van Wijk] wanted to use his RPi as a Spotify server. It’s a bit tricky to get everything configured for this, so he decided to give back by publishing a ready to use Spotify server image for the Raspberry Pi.

The project is call the Pi MusicBox. Like some of the RPi Pandora setups we’ve seen he included the ability to use the hardware as an AirPlay device too. To connect to the Spotify service he uses the Mopidy package. It can also play tracks from local storage (including the home network). It’s even capable of mixing the two sources in the same queue. Possibly the best part is that it can be controlled with any Music Player Daemon (MPD) client like the smart phone screenshots seen above.

If you’re interested, check out his GitHub repo for the project.

Extreme Game Boy hack plays titles from a wide range of systems

gameboy-ds-in-original-gb-case

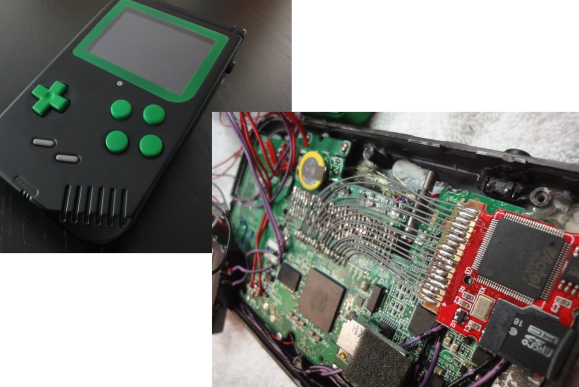
[Akira] can play any Game Boy, GBC, GBA, NES, SNES, or SMS game while on the go thanks to all the work he put into this portable gaming hack. The outside seems familiar; it’s an original Game Boy case. But you should immediately notice that it has a few extra buttons. That’s the first clue that what’s inside isn’t stock… which is a huge understatement.

The idea for the project started off rather simple, but quickly got out of hand (check out the build log for full details on that). He thought it would be nice to have a backlight for the original screen. After mixed results he scrapped the original mainboard and started anew with some Nintendo DS Lite hardware. It had a broken LCD connector so he tried a couple of different fixes to get it working again. After some success he started adding more equipment, like the extra pair of buttons, a better speaker on the battery door, and the microSD add-on you can see above.

You can catch a demo of the finished goods after the jump.

[Read more...]

ShuttAVR can snap a pic or serve as an intervalometer

shuttAVR-intervalometer-hack

This project started as a simple microcontroller replacement on this IR camera remote control PCB. But the soldering job went rather badly for [Balthamos] so he changed things up and designed his own simple AVR remote shutter release and intervalometer.

The DIP chip seen with most of its legs bent backwards is the ATtiny25 which makes the system work. It’s patched into the traces for the battery connections, button (on the other side of the board) and the IR LED he’s pinching with his left hand. Point it at a Cannon camera and push the button to snap a photo. But as you can see in the clip after the break it also serves as an intervalometer; letting him take several pictures with a user-defined pause between each. That mode is selected by first pressing and holding the button. Once released the chip waits for a second button press to register the delay. The new circuit still fits in the original case after just a bit of alteration to it.

[Read more...]

Minimalist user interface for headless Raspberry Pi applications

minimial-ui-for-headless-rpi

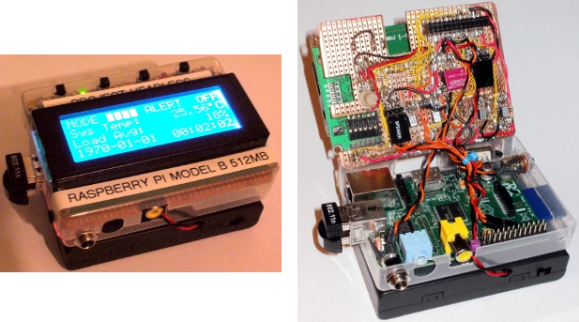
[Jason Birch] just finished building a beautifully simple user interface for the Raspberry Pi. The goal was to keep it small and intuitive while still providing a range of functionality. His add-on hardware gives feedback using several LEDs and a four-line character LCD screen. It provides control using just four momentary press switches.

The base for the add-on hardware is a chunk of protoboard the same size as the Pi itself. This is just slightly wider than the LCD screen, leaving room along the top for the row of buttons with different colors of LEDs in between them. Look closely in that nest of point-to-point wiring and you’ll find the dual pin-socket which mates with the RPi GPIO header. One important note from [Jason] mentions that the LCD screen R/W pin must be tied to ground. This keeps it from going into read mode, which would push 5V over the I/O pins, potentially damaging the 3.3V tolerant header on the RPi.

Throw in a battery and that pretty much covers the hardware. To see how he’s using it you’ll want to view the video clip after the break.

[Read more...]

Cardboard lampshade makes ordinary recycling a centerpiece of your room

cardboard-lamp-shade

This cube lamp was assembled using common cardboard. Not only does it look interesting, but it’s basically free with every Ikea purchase since all you need is a source of cardboard, cutting implements, and glue.

[Lindarose92] fabricated the shade out of narrow strips of corrugated cardboard. This particular lamp also has a cardboard base but we’re sure you could use it for just about any light source with doesn’t generate enough heat to cause problems. The build starts out with the tedious process of cutting 5mm by 8cm strips, and you’re going to need a lot of them. Each strip is cut perpendicular to the corrugation, which allows the light to shine through the wave pattern. The strips are then glued into 8cm x 8cm squares, which are in turn glued together into the four by four panels that make up each side of the cube.

Boom, you’re done. And if you get tired of it, just toss the thing in your recycling bin.

[via Hacked Gadgets]

Retrotechtacular: Mechanical targeting computers

retrotechtacular-mechanical-computer

The device that these seamen are standing around is a US Navy targeting computer. It doesn’t use electricity, but relies on mechanical computing to adjust trajectories of the ship’s guns. Setting up to twenty-five different attributes by turning cranks and other input mechanisms lets the computer automatically calculate the gun settings necessary to hit a target. These parameters include speed and heading of both the ship and it’s target, wind speed and bearing, and the location of the target in relation to this ship. It boggles the mind to think of the complexity that went into this computer.

The first of this seven part series can be seen after the break. The collection covers shafts,  gears, cams, and differentials. Sounds like it would be quite boring to sit through, huh? But as we’ve come to expect from this style and vintage of training film it packs a remarkable number of simple demonstrations into the footage.

[Read more...]