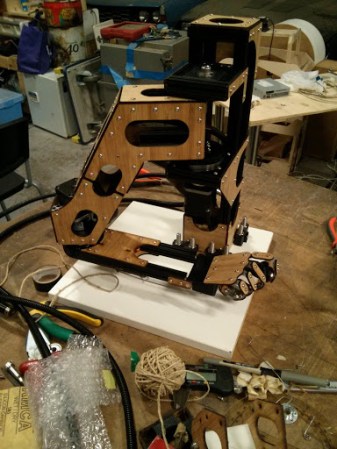
Handwriting robot arm is a little stiff-wristed

handwriting-robot

Check out this robot arm capable of handwriting which is orders of magnitude clearer than our own. It was built by [Patrick Barnes] as contract work for a campaign to raise funding for research into Duchenne Muscular Dystrophy.

Don’t miss the video after the break which starts off with the satisfying whine of some serious stepper motors. Judging scale from this image is a bit tough, but [Patrick] tells us that the entire assembly stands almost fourteen inches tall and the arm has a reach of around twenty inches. The demonstration shows off it’s abilities by drawing a Hilbert Curve. From watching the action you’ll realize that, though this arm and hand look fantastic, this is really a SCARA plotter. The wrist and fingers are for looks only, providing a place where the felt-tipped pen can be mounted (held flush to the paper with a rubber band). Whether that’s a disappointment or not, the precision and look of the machine bring it very high marks. It could take a bit of a lesson in penmanship from another we’ve seen though.

[Read more...]

Hi-Hat MIDI controller

midi-hi-hat-controller

Drumming hackers take note, if you’ve got an extra bass drum pedal it’s cheap and simple to use it as a MIDI controller. This rig was thrown together to supplement a DIG DRUM electric drum set. That piece of equipment has a pedal add-on that didn’t come with it. Turns out all it does is feed a resistance value to the set.

To get this up and running a frame was built from a metal base and acrylic side piece. The acrylic hosts a trimmable potentiometer which connects to an 1/4″ stereo jack right beside it. This facilitates connecting the pedal to the drum set using an audio patch cable. Interface with the pedal is accomplished with a few bits from the hardware store. The axle of the pedal sticks out one side, and is clamped between two washers. The other side of the washer grip the timpot causing it to move when the pedal does.

This hardware is a snap to use with your own MIDI device. We’d suggest giving the HIDUINO package a try.

Color NTSC video directly from an AVR chip

color-ntsc-from-avr-chip

We’ve seen composite video out from AVR chips many times before. But we can’t remember coming across one that managed to produce a color signal. This project does just that, producing a color video signal from an ATmega168 without using external integrated circuits.

[CNLohr] is seen here showing off his accomplishment. You’ll remember him from the glass-slide PCB server project he’s been working on recently. This time around it’s a small piece of gaming hardware which he’s working on. But using four pins from the microcontroller, connected via resistors in parallel, he is able to generate a color NTSC signal without using a chip like the AD723.

After the break you can see the two minute demo in which he shows the game running for just an moment, then gives a general overview of how the signals are being built. There isn’t a ton of explanation, but he did post his code as well as a resource for you to teach yourself more about the NTSC standard. Maybe you can make a color version of that AVR tetris game?

[Read more...]

Business card draws [ch00f]‘s logo

card

[ch00f] is at it again, expanding the horizons of the art of PCB business cards. This one draws his logo on any computer over a USB port.

The physical design of the card is heavily inspired by [Frank Zhao]‘s card; both use an ATtiny85 and the V-USB package to handle the USB protocol and communications. Instead of typing words into a text editor like [Frank]‘s, [ch00f]‘s card draws the ch00ftech logo in MS Paint or other image editor.

There was a problem with simply emulating the mouse to draw a logo on the screen, though; because different computers have different mouse settings for acceleration, the ch00ftech logo was nearly always distorted. [ch00f] fixed that by emulating an absolute input device, basically turning his business card into a single-function pen tablet.

The logo was traced by hand and put into a few arrays in the firmware. Surprisingly, the logo didn’t take up much space – only 4k of the tiny85′s flash is used. There’s a lot more space for a more complicated drawing, but for now the simple ch00ftech logo (video after the break) will do.

[Read more...]

Making a 12V bulb work in a 6V socket

12v-led-in-6v-socket

This is something of a square peg in a round hole type of problem. [Kiel Lydestad] has been riding a vintage Moped around. You know, a motorcycle that can be pedaled like a bike. He of course wants to keep the thing looking stock, but also needs it to be fully functional. Enter this light bulb replacement project. His brake light needed a new bulb, and he managed to make this 12V LED bulb work in the 6V socket.

An LED is a really great choice for this application since the Motobécane Moped uses a magneto generator to power the lights. It won’t pull much current, but it did need modification to run from half as much voltage. [Kiel] mentions that it may have been possible to crack open the LED tower and adjust the current limiting circuit inside, but he felt it was easier to just add this voltage doubling circuit. He assembled the components in a way that still allows them to fit in the metal base of the bulb.

Robot steals soda from the vending machine

robot-steals-soda

It’s very hard to tell from this photo because of the super bright blue LEDs, but this soda machine is being robbed by a robot.

We don’t condone theft, but neither does the creator of the project. [Ioduremetallique] is really just problem solving; doing something because he can. And we’d bet this type of thing will end up landing him a high-paying job some day (we’re assuming he’s currently in school).

The project is shown off in the video after the break. The gist of it is that a compact robot arm is put into the drop area of a vending machine. After the flap is closed the wired remote control is used to raise up the telescoping arm, and grip the soda can with the grippers. It’s brilliant and devious all at the same time. The entire video is in French, but the YouTube captions translator actually worked quite well with this video. To turn it one, use the ‘CC’ icon on the bottom of the video. We had to select the French captions before it would allow us to chose English from the translated captions list. About four minutes in we get a great look at the hardware itself… a super hack!

[Read more...]

Extending old games with reverse engineering and MAME

HEX

For last year’s Toorcamp, the folks over at DorkbotPDX helped out with the Church of Robotron installation. A religion founded on the prophesy of a cybernetic uprising in the year 2084 is a little esoteric even for us, so the Dorkbot crew wanted a way to make playing Robotron: 2084 a little more visceral. Using MAME and a few debugging tools, they were able to read the memory of a machine playing Robotron to extend the game into the physical world. When the player dies, lights go off, alarms sound, and the prophet of the Church of Robotron is pleased.

The setup at the Church of Robotron included a machine running MAME with a Robotron ROM. When events happened in the game, such as lasers firing or a player death, physical events would be triggered. To do this, the Dorkbot team read the memory locations of a game of Robotron at different times and found memory locations tied to in-game events. On their blog they go over using the MAME debug tool to detect a player’s death which can then be translated into physical apparitions for the Church of Robotron.

It’s a very cool hack, and one we wish we had a video of. Having a plastic ghost hit a player while playing Pac-Man seems like an awesome idea, and with the Dorkbot tutorial, it looks fairly easy.