Acoustic bass guitar uses water jug and two strings

water-bottle-acoustic-guitar

It’s easy to dismiss this one at first glance. But once you hear [Tychsen81] playing the thing you’ll want to know more.

He posted the demonstration way back in 2009. It wasn’t until a year later that he filmed the particulars of how the thing was made. The strings are actually bass guitar strings, an A and D string that are tuned down to E and A to play along with Black Sabbath’s “Ironman”. The neck is made out of two boards. One serves as the fingerboard, which is fretless. The other is mounted under that in order to provide negative space for the bridge while keeping the strings at the right height for the fingerboard. The water bottle helps to amplify the sound and that’s why the bottom end of the strings pivot on the bridge, pass through the neck, and are anchored on the bottom edge of the bottle.

We’ve embedded both the demo and the build videos after the break.

If this gets you thinking about making your own instruments you will also be interested in the Whamola.

[Read more...]

Making PLA stick to a 3D printer build platform by using hairspray or an acetone ABS slurry

hairspary-pla-adhesion

[Chris] has been having some real problems getting PLA to stick to the build platform of his Printrbot. This is of course not limited to this brand of printers, and affects all extruder-based hardware using the PLA as a source material. He came up with a couple of ways to fix the problem.

The first is something we’re quite familiar with. The image above shows [Chris] applying a thin layer of hairspray to the platform. This is a technique the we use with our own 3D printer. The sheets of paper are used as a mask to help keep the sticky stuff off of the threaded rod. For more info on the hairspray trick [Chris] recommends that you read this article.

The second technique uses a slurry made from saturating a bottle of acetone with ABS leftovers. In the clip after the break he shows off a glass jar of the solvent with scraps from past print jobs hanging out inside. After a couple of days like that it’s ready to use. He takes a paper towel, wets it with the solution, and wipes on a very small amount. He does mention that this will eventually eat through the Kapton tape so apply it rarely and sparingly.

[Read more...]

Rolling your own minimal USB to serial Arduino programmer

usb-to-serial-programmer

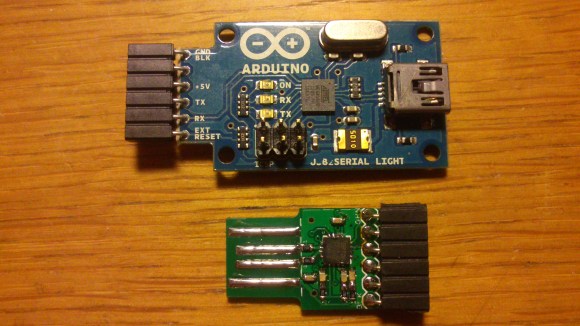
[Hans Peter] wanted to move away from using full Arduino boards in his projects. One of the components he rarely used after the development stage is the USB hardware. Once the firmware is flashed to the chip he didn’t need it any longer. So he tried his hand with some really small SMD parts by building this USB to serial Arduino programmer.

The chip he went with isn’t the FTDI part we’re used to. Instead of using an FT232RL, he opted for its smaller cousin the FT230x. This chip doesn’t fully implement the communications protocol of the 232, but it does work with AVRdude and that’s all that really matters. Above you can see [Hans'] creation next to the official Arduino USB-to-serial programmer. He used the same connection scheme, but went with an edge connector for the USB instead of using a mini-B jack.

It’s pretty impressive to see his prototyping work with the 16-pin QFN package. He soldered it dead-bug style to a couple of SIL pin headers in order to test it on a breadboard. The first board he assembled was too loose in the USB port, but he added some tape to the back to make it thicker, and coated the edge connector traces with a bit of solder and that did the trick.

Fixing the worst video game ever: E.T. for Atari 2600

fixing-et-for-atari-2600

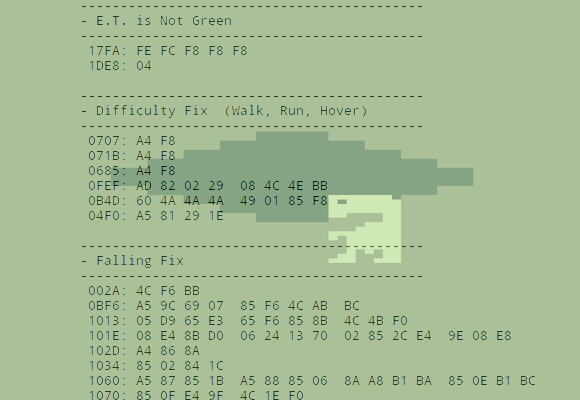
This hack has got to be every gamer’s dream. Someone actually took the time to dig through the binary file of E.T. the Extra-Terrestrial and fix the errors that made it an abomination of a title for the Atari 2600.

This is quite a feat in many ways. First off, you need to know the game well enough to understand where they problems lie. The Internet is a huge help in that regard as there’s no shortage of sources complaining about the game’s shortcomings. This turns out to be one of the articles strongest points as the author takes time to address the most common myths about bugs in the game. From there he goes on to discuss the problems that were actually fixed. Some are just general tweaks like the color fix listed above. But most of them are genuine improvements in the game play, like the falling fix which prevents E.T. from falling in this pit when his feet are obviously not anywhere near the edge.

So you couldn’t get your hard earned bucks back for a bummer of a game back in the day. But at least a few decades later you can fix the things that made it suck and play it through the way it should have been.

[via Reddit]

Light Graffiti with Servos and Python

servo-laser-light-graffiti

Light Graffiti is can be lots of fun if you have a decent amount of artistic ability, and a keen sense of timing. If you don’t have the necessary skills, you can always compensate by using Python-controlled servos to move everything automatically. The Python code can be found here, and makes use of the Python Image Library to process the images into a “drawable” form. A [pyMCU] with firmware capable of simultaneous servo control was used to move the laser fixture around.

One of the more difficult aspects of this experiment was getting the timing correct between each laser pulse. The timing routine involes a bit of geometry, calculating the distance between each using trig. As explained in the article, this may be a bit of overkill.  It still didn’t compare to the trig involved in a previous experiment drawing a circle with this laser-servo fixture.  Be sure to check out the video of this laser-setup in action after the break.  I’ve been quite pleased with the results, and look forward to what can be done with it in the future!

Thanks to [pyMCU] for letting me have a few of these boards to play with!

[Read more...]

Stapler hack fastens infinitely large sheets of paper

infinity-stapler

It’s not called the infinity stapler, but we think it should be. This magnetic hack allows you to use a plain old stapler to fasten very large pieces of paper.

The limiting factor has always been the distance between the stapler’s hinge and where the staples come out. To get around this, the crimped connections between the base and the dispenser were drilled out. Larger holes were then drilled in both the top and bottom halves to accept a set of magnets. These were held in place temporarily with some tape while the super glue had time to set up.

The result is two halves which are placed on either side of the over sized paper. The magnets are responsible for aligning the staples with the die which bends them to their final shape. The whole process is shown in the video clip after the break.

[Read more...]

H-bot style 3D printer moves bed for Z-axis

h-bot-style-3d-printer

Check out this 3D printer (translated) which [Arkadiusz Śpiewak] has been working on. When sending in the tip about his project he made the important distinction that it isn’t finished, but he has reached that critical threshold where he has printed items with it.

He decided to go with a design that is sometimes referred to as an H-bot. If you’re completely unfamiliar with it, you may find this H-bot design article helpful. The gist of it is that this technique makes it so that the motors used to move the extruder along the X and Y axes are themselves stationary. One large timing (toothed) belt makes a circuit around the top of this cube in the shape of the letter H. This is a bit easier to see in [Arkadiusz's] rendered image found after the jump along with video of an early print test.

The Z axis uses two motors mounted along the bottom of the cube. These raise and lower the bead, instead of moving the extruder itself. All-in the printer should have a maximum object size of 30x30x30 centimeters. It’s being driven by a Smoothieboard, which was mentioned quite a bit when we were discussing using the RA driver board with a 3D printer.

[Read more...]