# Split
Split is a rack based ab testing framework designed to work with Rails, Sinatra or any other rack based app.
Split is heavily inspired by the Abingo and Vanity rails ab testing plugins and Resque in its use of Redis.
Split is designed to be hacker friendly, allowing for maximum customisation and extensibility.
[](http://badge.fury.io/rb/split)
[](http://travis-ci.org/andrew/split)
[](https://gemnasium.com/andrew/split)
[](https://codeclimate.com/github/andrew/split)
[](https://coveralls.io/r/andrew/split)
## Requirements
Split currently requires Ruby 1.9.2 or higher. If your project requires compatibility with Ruby 1.8.x and Rails 2.3, please use v0.8.0.
Split uses redis as a datastore.
Split only supports redis 2.0 or greater.
If you're on OS X, Homebrew is the simplest way to install Redis:
```bash
$ brew install redis
$ redis-server /usr/local/etc/redis.conf
```
You now have a Redis daemon running on 6379.
## Setup
If you are using bundler add split to your Gemfile:
``` ruby
gem 'split'
```
Then run:
```bash
$ bundle install
```
Otherwise install the gem:
```bash
$ gem install split
```
and require it in your project:
```ruby
require 'split'
```
### Rails 3
Split is autoloaded when rails starts up, as long as you've configured redis it will 'just work'.
### Sinatra
To configure sinatra with Split you need to enable sessions and mix in the helper methods. Add the following lines at the top of your sinatra app:
```ruby
class MySinatraApp < Sinatra::Base
enable :sessions
helpers Split::Helper
get '/' do
...
end
```
## Usage
To begin your ab test use the `ab_test` method, naming your experiment with the first argument and then the different alternatives which you wish to test on as the other arguments.
`ab_test` returns one of the alternatives, if a user has already seen that test they will get the same alternative as before, which you can use to split your code on.
It can be used to render different templates, show different text or any other case based logic.
`finished` is used to make a completion of an experiment, or conversion.
Example: View
```erb
<% ab_test("login_button", "/images/button1.jpg", "/images/button2.jpg") do |button_file| %>
<%= img_tag(button_file, :alt => "Login!") %>
<% end %>
```
Example: Controller
```ruby
def register_new_user
# See what level of free points maximizes users' decision to buy replacement points.
@starter_points = ab_test("new_user_free_points", '100', '200', '300')
end
```
Example: Conversion tracking (in a controller!)
```ruby
def buy_new_points
# some business logic
finished("new_user_free_points")
end
```
Example: Conversion tracking (in a view)
```erb
Thanks for signing up, dude! <% finished("signup_page_redesign") %>
```
You can find more examples, tutorials and guides on the [wiki](https://github.com/andrew/split/wiki).
## Statistical Validity
Split has two options for you to use to determine which alternative is the best.
The first option (default on the dashboard) uses a z test (n>30) for the difference between your control and alternative conversion rates to calculate statistical significance. This test will tell you whether an alternative is better or worse than your control, but it will not distinguish between which alternative is the best in an experiment with multiple alternatives. Split will only tell you if your experiment is 90%, 95%, or 99% significant, and this test only works if you have more than 30 participants and 5 conversions for each branch.
As per this [blog post](http://www.evanmiller.org/how-not-to-run-an-ab-test.html) on the pitfalls of A/B testing, it is highly recommended that you determine your requisite sample size for each branch before running the experiment. Otherwise, you'll have an increased rate of false positives (experiments which show a significant effect where really there is none).
[Here](http://www.evanmiller.org/ab-testing/sample-size.html) is a sample size calculator for your convenience.
The second option uses simulations from a beta distribution to determine the probability that the given alternative is the winner compared to all other alternatives. You can view these probabilities by clicking on the drop-down menu labeled "Confidence." This option should be used when the experiment has more than just 1 control and 1 alternative. It can also be used for a simple, 2-alternative A/B test.
## Extras
### Weighted alternatives
Perhaps you only want to show an alternative to 10% of your visitors because it is very experimental or not yet fully load tested.
To do this you can pass a weight with each alternative in the following ways:
```ruby
ab_test('homepage design', {'Old' => 20}, {'New' => 2})
ab_test('homepage design', 'Old', {'New' => 0.1})
ab_test('homepage design', {'Old' => 10}, 'New')
```
This will only show the new alternative to visitors 1 in 10 times, the default weight for an alternative is 1.
### Overriding alternatives
For development and testing, you may wish to force your app to always return an alternative.
You can do this by passing it as a parameter in the url.
If you have an experiment called `button_color` with alternatives called `red` and `blue` used on your homepage, a url such as:
http://myawesomesite.com?button_color=red
will always have red buttons. This won't be stored in your session or count towards to results, unless you set the `store_override` configuration option.
In the event you want to disable all tests without having to know the individual experiment names, add a `SPLIT_DISABLE` query parameter.
http://myawesomesite.com?SPLIT_DISABLE=trues
It is not required to send `SPLIT_DISABLE=false` to activate Split.
### Starting experiments manually
By default new AB tests will be active right after deployment. In case you would like to start new test a while after
the deploy, you can do it by setting the `start_manually` configuration option to `true`.
After choosing this option tests won't be started right after deploy, but after pressing the `Start` button in Split admin dashboard.
### Reset after completion
When a user completes a test their session is reset so that they may start the test again in the future.
To stop this behaviour you can pass the following option to the `finished` method:
```ruby
finished('experiment_name', :reset => false)
```
The user will then always see the alternative they started with.
### Multiple experiments at once
By default Split will avoid users participating in multiple experiments at once. This means you are less likely to skew results by adding in more variation to your tests.
To stop this behaviour and allow users to participate in multiple experiments at once enable the `allow_multiple_experiments` config option like so:
```ruby
Split.configure do |config|
config.allow_multiple_experiments = true
end
```
### Experiment Persistence
Split comes with three built-in persistence adapters for storing users and the alternatives they've been given for each experiment.
By default Split will store the tests for each user in the session.
You can optionally configure Split to use a cookie, Redis, or any custom adapter of your choosing.
#### Cookies
```ruby
Split.configure do |config|
config.persistence = :cookie
end
```
__Note:__ Using cookies depends on `ActionDispatch::Cookies` or any identical API
#### Redis
Using Redis will allow ab_users to persist across sessions or machines.
```ruby
Split.configure do |config|
config.persistence = Split::Persistence::RedisAdapter.with_config(:lookup_by => proc { |context| context.current_user_id })
# Equivalent
# config.persistence = Split::Persistence::RedisAdapter.with_config(:lookup_by => :current_user_id }
end
```
Options:
* `lookup_by`: method to invoke per request for uniquely identifying ab_users (mandatory configuration)
* `namespace`: separate namespace to store these persisted values (default "persistence")
#### Custom Adapter
Your custom adapter needs to implement the same API as existing adapters.
See `Split::Persistance::CookieAdapter` or `Split::Persistence::SessionAdapter` for a starting point.
```ruby
Split.configure do |config|
config.persistence = YourCustomAdapterClass
end
```
### Trial Event Hooks
You can define methods that will be called at the same time as experiment
alternative participation and goal completion.
For example:
``` ruby
Split.configure do |config|
config.on_trial_choose = :log_trial_choice
config.on_trial_complete = :log_trial_complete
end
```
Set these attributes to a method name available in the same context as the
`ab_test` method. These methods should accept one argument, a `Trial` instance.
``` ruby
def log_trial_choose(trial)
logger.info "experiment=%s alternative=%s user=%s" %
[ trial.experiment.name, trial.alternative, current_user.id ]
end
def log_trial_complete(trial)
logger.info "experiment=%s alternative=%s user=%s complete=true" %
[ trial.experiment.name, trial.alternative, current_user.id ]
end
```
#### Views
If you are running `ab_test` from a view, you must define your event
hook callback as a
[helper_method](http://apidock.com/rails/AbstractController/Helpers/ClassMethods/helper_method)
in the controller:
``` ruby
helper_method :log_trial_choose
def log_trial_choose(trial)
logger.info "experiment=%s alternative=%s user=%s" %
[ trial.experiment.name, trial.alternative, current_user.id ]
end
```
### Experiment Hooks
You can assign a proc that will be called when an experiment is reset or deleted. You can use these hooks to call methods within your application to keep data related to experiments in sync with Split.
For example:
``` ruby
Split.configure do |config|
config.on_experiment_reset = proc{ |experiment| # Do something on reset }
config.on_experiment_delete = proc{ |experiment| # Do something else on delete }
end
```
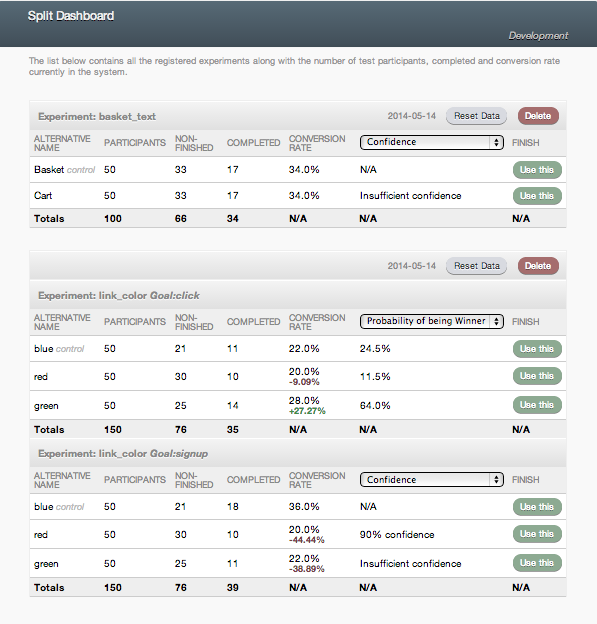
## Web Interface
Split comes with a Sinatra-based front end to get an overview of how your experiments are doing.
If you are running Rails 2: You can mount this inside your app using Rack::URLMap in your `config.ru`
```ruby
require 'split/dashboard'
run Rack::URLMap.new \
"/" => Your::App.new,
"/split" => Split::Dashboard.new
```
However, if you are using Rails 3: You can mount this inside your app routes by first adding this to the Gemfile:
```ruby
gem 'split', :require => 'split/dashboard'
```
Then adding this to config/routes.rb
```ruby
mount Split::Dashboard, :at => 'split'
```
You may want to password protect that page, you can do so with `Rack::Auth::Basic` (in your split initializer file)
```ruby
Split::Dashboard.use Rack::Auth::Basic do |username, password|
username == 'admin' && password == 'p4s5w0rd'
end
```
You can even use Devise or any other Warden-based authentication method to authorize users. Just replace `mount Split::Dashboard, :at => 'split'` in `config/routes.rb` with the following:
```ruby
match "/split" => Split::Dashboard, :anchor => false, :via => [:get, :post], :constraints => lambda { |request|
request.env['warden'].authenticated? # are we authenticated?
request.env['warden'].authenticate! # authenticate if not already
# or even check any other condition such as request.env['warden'].user.is_admin?
}
```
More information on this [here](http://steve.dynedge.co.uk/2011/12/09/controlling-access-to-routes-and-rack-apps-in-rails-3-with-devise-and-warden/)
### Screenshot
## Configuration
You can override the default configuration options of Split like so:
```ruby
Split.configure do |config|
config.db_failover = true # handle redis errors gracefully
config.db_failover_on_db_error = proc{|error| Rails.logger.error(error.message) }
config.allow_multiple_experiments = true
config.enabled = true
config.persistence = Split::Persistence::SessionAdapter
#config.start_manually = false ## new test will have to be started manually from the admin panel. default false
config.include_rails_helper = true
end
```
You can set different Redis host via environment variable ```REDIS_URL```.
### Filtering
In most scenarios you don't want to have AB-Testing enabled for web spiders, robots or special groups of users.
Split provides functionality to filter this based on a predefined, extensible list of bots, IP-lists or custom exclude logic.
```ruby
Split.configure do |config|
# bot config
config.robot_regex = /my_custom_robot_regex/ # or
config.bots['newbot'] = "Description for bot with 'newbot' user agent, which will be added to config.robot_regex for exclusion"
# IP config
config.ignore_ip_addresses << '81.19.48.130' # or regex: /81\.19\.48\.[0-9]+/
# or provide your own filter functionality, the default is proc{ |request| is_robot? || is_ignored_ip_address? }
config.ignore_filter = proc{ |request| CustomExcludeLogic.excludes?(request) }
end
```
### Experiment configuration
Instead of providing the experiment options inline, you can store them
in a hash. This hash can control your experiment's alternatives, weights,
algorithm and if the experiment resets once finished:
```ruby
Split.configure do |config|
config.experiments = {
"my_first_experiment" => {
:alternatives => ["a", "b"],
:resettable => false
},
"my_second_experiment" => {
:algorithm => 'Split::Algorithms::Whiplash',
:alternatives => [
{ :name => "a", :percent => 67 },
{ :name => "b", :percent => 33 }
]
}
}
end
```
You can also store your experiments in a YAML file:
```ruby
Split.configure do |config|
config.experiments = YAML.load_file "config/experiments.yml"
end
```
You can then define the YAML file like:
```yaml
my_first_experiment:
alternatives:
- a
- b
my_second_experiment:
alternatives:
- name: a
percent: 67
- name: b
percent: 33
resettable: false
```
This simplifies the calls from your code:
```ruby
ab_test("my_first_experiment")
```
and:
```ruby
finished("my_first_experiment")
```
You can also add meta data for each experiment, very useful when you need more than an alternative name to change behaviour:
```yaml
my_first_experiment:
alternatives:
- a
- b
meta:
a:
text: "Have a fantastic day"
b:
text: "Don't get hit by a bus"
```
This allows for some advanced experiment configuration using methods like:
```ruby
trial.alternative.name # => "a"
trial.metadata['text'] # => "Have a fantastic day"
```
#### Metrics
You might wish to track generic metrics, such as conversions, and use
those to complete multiple different experiments without adding more to
your code. You can use the configuration hash to do this, thanks to
the `:metric` option.
```ruby
Split.configure do |config|
config.experiments = {
"my_first_experiment" => {
:alternatives => ["a", "b"],
:metric => :my_metric,
}
}
end
```
Your code may then track a completion using the metric instead of
the experiment name:
```ruby
finished(:my_metric)
```
You can also create a new metric by instantiating and saving a new Metric object.
```ruby
Split::Metric.new(:my_metric)
Split::Metric.save
```
#### Goals
You might wish to allow an experiment to have multiple, distinguishable goals.
The API to define goals for an experiment is this:
```ruby
ab_test({"link_color" => ["purchase", "refund"]}, "red", "blue")
```
or you can you can define them in a configuration file:
```ruby
Split.configure do |config|
config.experiments = {
"link_color" => {
:alternatives => ["red", "blue"],
:goals => ["purchase", "refund"]
}
}
end
```
To complete a goal conversion, you do it like:
```ruby
finished("link_color" => "purchase")
```
**NOTE:** This does not mean that a single experiment can have/complete progressive goals.
**Good Example**: Test if listing Plan A first result in more conversions to Plan A (goal: "plana_conversion") or Plan B (goal: "planb_conversion").
**Bad Example**: Test if button color increases conversion rate through multiple steps of a funnel. THIS WILL NOT WORK.
### DB failover solution
Due to the fact that Redis has no automatic failover mechanism, it's
possible to switch on the `db_failover` config option, so that `ab_test`
and `finished` will not crash in case of a db failure. `ab_test` always
delivers alternative A (the first one) in that case.
It's also possible to set a `db_failover_on_db_error` callback (proc)
for example to log these errors via Rails.logger.
### Redis
You may want to change the Redis host and port Split connects to, or
set various other options at startup.
Split has a `redis` setter which can be given a string or a Redis
object. This means if you're already using Redis in your app, Split
can re-use the existing connection.
String: `Split.redis = 'localhost:6379'`
Redis: `Split.redis = $redis`
For our rails app we have a `config/initializers/split.rb` file where
we load `config/split.yml` by hand and set the Redis information
appropriately.
Here's our `config/split.yml`:
```yml
development: localhost:6379
test: localhost:6379
staging: redis1.example.com:6379
fi: localhost:6379
production: redis1.example.com:6379
```
And our initializer:
```ruby
split_config = YAML.load_file(Rails.root.join('config', 'split.yml'))
Split.redis = split_config[Rails.env]
```
## Namespaces
If you're running multiple, separate instances of Split you may want
to namespace the keyspaces so they do not overlap. This is not unlike
the approach taken by many memcached clients.
This feature is provided by the [redis-namespace](https://github.com/defunkt/redis-namespace) library, which
Split uses by default to separate the keys it manages from other keys
in your Redis server.
Simply use the `Split.redis.namespace` accessor:
```ruby
Split.redis.namespace = "split:blog"
```
We recommend sticking this in your initializer somewhere after Redis
is configured.
## Outside of a Web Session
Split provides the Helper module to facilitate running experiments inside web sessions.
Alternatively, you can access the underlying Metric, Trial, Experiment and Alternative objects to
conduct experiments that are not tied to a web session.
```ruby
# create a new experiment
experiment = Split::Experiment.find_or_create('color', 'red', 'blue')
# create a new trial
trial = Split::Trial.new(:experiment => experiment)
# run trial
trial.choose!
# get the result, returns either red or blue
trial.alternative.name
# if the goal has been achieved, increment the successful completions for this alternative.
if goal_acheived?
trial.complete!
end
```
## Algorithms
By default, Split ships with `Split::Algorithms::WeightedSample` that randomly selects from possible alternatives for a traditional a/b test.
It is possible to specify static weights to favor certain alternatives.
`Split::Algorithms::Whiplash` is an implementation of a [multi-armed bandit algorithm](http://stevehanov.ca/blog/index.php?id=132).
This algorithm will automatically weight the alternatives based on their relative performance,
choosing the better-performing ones more often as trials are completed.
Users may also write their own algorithms. The default algorithm may be specified globally in the configuration file, or on a per experiment basis using the experiments hash of the configuration file.
To change the algorithm globally for all experiments, use the following in your initializer:
```ruby
Split.configure do |config|
config.algorithm = Split::Algorithms::Whiplash
end
```
## Extensions
- [Split::Export](http://github.com/andrew/split-export) - easily export ab test data out of Split
- [Split::Analytics](http://github.com/andrew/split-analytics) - push test data to google analytics
- [Split::Mongoid](https://github.com/MongoHQ/split-mongoid) - store experiment data in mongoid (still uses redis)
- [Split::Cacheable](https://github.com/harrystech/split_cacheable) - automatically create cache buckets per test
- [Split::Counters](https://github.com/bernardkroes/split-counters) - add counters per experiment and alternative
## Screencast
Ryan bates has produced an excellent 10 minute screencast about split on the Railscasts site: [A/B Testing with Split](http://railscasts.com/episodes/331-a-b-testing-with-split)
## Blogposts
* [A/B Testing with Split in Ruby on Rails](http://grinnick.com/posts/a-b-testing-with-split-in-ruby-on-rails)
* [Recipe: A/B testing with KISSMetrics and the split gem](http://robots.thoughtbot.com/post/9595887299/recipe-a-b-testing-with-kissmetrics-and-the-split-gem)
* [Rails A/B testing with Split on Heroku](http://blog.nathanhumbert.com/2012/02/rails-ab-testing-with-split-on-heroku.html)
## Contributors
Over 70 different people have contributed to the project, you can see them all here: https://github.com/andrew/split/graphs/contributors
## Development
Source hosted at [GitHub](http://github.com/andrew/split).
Report Issues/Feature requests on [GitHub Issues](http://github.com/andrew/split/issues).
Discussion at [Google Groups](https://groups.google.com/d/forum/split-ruby)
Tests can be ran with `rake spec`
### Note on Patches/Pull Requests
* Fork the project.
* Make your feature addition or bug fix.
* Add tests for it. This is important so I don't break it in a
future version unintentionally.
* Add documentation if necessary.
* Commit, do not mess with rakefile, version, or history.
(if you want to have your own version, that is fine but bump version in a commit by itself I can ignore when I pull)
* Send a pull request. Bonus points for topic branches.
## Copyright
Copyright (c) 2015 Andrew Nesbitt. See [LICENSE](https://github.com/andrew/split/blob/master/LICENSE) for details.